IDA Python(~ Appcall 編 ~)
0x1 はじめに
IDAPython - くじらとたぬき ではIDA Pythonを用いていくつか例を記述してみた.
今回はAppcall を用いた例について, 覚書を記しておく.
0x2 Appcall とは
Appcall is a mechanism to call functions inside the debugged program from the debugger or your
script as if it were a built-in function.
Such a mechanism can be used for debugging, fuzzing and testing applications.
Appcall mechanism highly depends on the type information of the function to be called. For that
reason it is necessary to have a correct function prototype before doing an Appcall, otherwise
different or incorrect results may be returned
関数をスクリプトでいい感じに実行できるという機能.
ファジングとか難読化の解析などが想定される.
地味に解析やってるときに便利そう.(IDAでデバッグするかどうかは別として...)
0x3 実行例
シンプルな以下のプログラムを作成する.
その1(MessageBoxA)
Script command(Shift F2)から以下のコードを入力.
Appcall.MessageBoxA(0, "hoge", "hogehoge", 0)

MessageBoxが実行されるのを確認.
その2(add_func 関数を呼び出す)
同様に以下のコードを入力. (※ add_func関数はsub_F75E8Cに相当する)
proto = "int sub_F75E8C(int a, int b);"
func = Appcall.proto(0xF75E8C, proto);
ret = func(Appcall.int64(2), Appcall.int64(3));
print(ret)

add_func 関数が実行されるのを確認.
0x4 所感
使いどころはいろいろありそう.
0x5 参考
https://hex-rays.com/products/ida/support/tutorials/debugging_appcall.pdf
Windows の遠隔管理ツールについて
0x1 はじめに
Windowsを遠隔管理できるツールについてのメモ
0x2 検証環境
各ツールでプロセス(calc.exe)を実行し, Sysmon +ProcExp を利用してそれぞれの結果を検証することをゴールとする.
前処理(必要に応じて)
- PSVersionを 5.1.14409.1005に変更
- 識別されていないネットワークをプライベートネットワークに変更する.
- グループポリシーを変更(Security Settings -> Network List Manager Policies -> Unidentified NetworkでLocation typeをPrivateに変更)
- FWを無効化
0x3 検証
WMI(Windows Management Instrumentation)
- 実行コマンド
> wmic /node:192.168.56.106 /user:IEUser /password:Passw0rd! process call create calc
- 結果

| Integrity Levels(calc.exe) | High |
| Session | 0 |
| ParentImage | C:\Windows\System32\wbem\WmiPrvSE.exe |
| ParentCommandLine | C:\Windows\system32\wbem\wmiprvse.exe -secured -Embedding |
| Integrity Levels(WmiPrvSE.exe) | System |
| ParentImage(Parent) | C:\Windows\System32\svchost.exe |
| ParentCommandLine(Parent) | C:\Windows\system32\svchost.exe -k DcomLaunch |
| Integrity Levels(svchost.exe) | System |
WinRM
コマンド
- Win 7(192.168.56.106)
> winrm qc
- Win 8(接続元)
# 追加
> Set-Item WSMan:\localhost\Client\TrustedHosts -Value "192.168.56.106"
# 確認
> Get-Item WSMan:\localhost\Client\TrustedHosts
   WSManConfig: Microsoft.WSMan.Management\WSMan::localhost\Client

Type            Name                           SourceOfValue   Value
----            ----                           -------------   -----
System.String   TrustedHosts                                   192.168.56.106
# 情報収集
> winrm id -r:192.168.56.106
IdentifyResponse
    ProtocolVersion = http://schemas.dmtf.org/wbem/wsman/1/wsman.xsd
    ProductVendor = Microsoft Corporation
    ProductVersion = OS: 6.1.7601 SP: 1.0 Stack: 3.0
    SecurityProfiles
        SecurityProfileName = http://schemas.dmtf.org/wbem/wsman/1/wsman/secprofile/http/spnego-kerberos
WinRS(Windows Remote Shell)
- コマンド
> winrs -r:192.168.56.106 calc
- 結果

| Integrity Levels(calc.exe) | High |
| Session | 0 |
| ParentImage | C:\Windows\System32\cmd.exe |
| ParentCommandLine | C:\Windows\system32\cmd.exe /C calc |
| Integrity Levels(WmiPrvSE.exe) | High |
| ParentImage(Parent) | C:\Windows\System32\winrshost.exe |
| ParentCommandLine(Parent) | C:\Windows\system32\WinrsHost.exe -Embedding |
| Integrity Levels(winrshost.exe) | High |
| ParentImage(PParent) | C:\Windows\System32\svchost.exe |
| ParentCommandLine(PParent) | C:\Windows\system32\svchost.exe -k DcomLaunch |
| Integrity Levels(svchost.exe) | System |
PsExec
- 実行コマンド
> PsExec.exe \\192.168.56.106 -u IEUser -p Passw0rd! calc
- 結果

| Integrity Levels(calc.exe) | High |
| Session | 0 |
| ParentImage | C:\Windows\PSEXESVC.exe |
| ParentCommandLine | C:\Windows\PSEXESVC.exe |
| Integrity Levels(PSEXESVC.exe) | System |
| ParentImage(Parent) | C:\Windows\System32\services.exe |
| ParentCommandLine(Parent) | CC:\Windows\System32\services.exe |
| Integrity Levels(services.exe) | System |
0x4 まとめ
| - | ParentImage | Integrity Levels(calc.exe) | Session |
|---|---|---|---|
| WMI | C:\Windows\System32\wbem\WmiPrvSE.exe | High | 0 |
| WinRS | C:\Windows\System32\winrshost.exe(cmd.exe) | High | 0 |
| PsExec | C:\Windows\PSEXESVC.exe | High | 0 |
0x5 所感
EDR等の監視の参考にでも.
0x6 参考文献
マネージドコード(CLR)を呼び出す
0x1 はじめに
C(++)からマネージドコード(CLR)を呼び出す手法を示す.
0x2 ソースコード
- clr.cpp
- test.cs
0x3 実行
csc /target:library .\test.cs
0x4 備考
ここからメイン(?)
GUID
- CLSID_CLRMetaHost : {9280188D-0E8E-4867-B30C-7FA83884E8DE}
- IID_ICLRMetaHost : {D332DB9E-B9B3-4125-8207-A14884F53216}
- IID_ICLRRuntimeInfo : {BD39D1D2-BA2F-486A-89B0-B4B0CB466891}
- CLSID_CLRRuntimeHost : {90F1A06E-7712-4762-86B5-7A5EBA6BDB02}
- IID_ICLRRuntimeHost : {90F1A06C-7712-4762-86B5-7A5EBA6BDB02}
ppv
- pMetaHost->GetRuntime : [edx+0Ch]
- pRuntimeInfo->GetInterface : [edx+24h]
- pRuntimeHost->Start : [ecx+0Ch]
- pRuntimeHost->ExecuteInDefaultAppDomain : [edx+2Ch]
0x5 参考文献
MSBuildのインラインタスクについて
1. はじめに
MSBuildのインラインタスクを用いることによってコード実行が可能となる.
2. 手法
以下のxmlファイルを作成して, msbuildで実行するだけ(簡単!)
3. 実行結果
PS C:\Users\test\Desktop\work> C:\Windows\Microsoft.NET\Framework64\v4.0.30319\MSBuild.exe test.xml
Microsoft (R) Build Engine バージョン 4.8.3752.0
[Microsoft .NET Framework、バージョン 4.0.30319.42000]
Copyright (C) Microsoft Corporation. All rights reserved.

2019/08/05 22:33:32 にビルドを開始しました。
test


ビルドに成功しました。
    0 個の警告
    0 エラー

経過時間 00:00:00.79
4. 参考文献
検証環境構築(L3スイッチ+ルータ(セキュリティ製品)+VLAN)
はじめに
セキュリティ製品の検証環境構築の簡単なメモ.
L3スイッチ(Cisco) + ルータ(セキュリティ製品を想定)でVLAN環境を作る.
今回はPacket Tracerを用いた.
www.netacad.com
検証環境構築
パターン1
L3スイッチでVLANを分けて, トランクポートで接続するパターン

スイッチ
- Switch>ena
- Switch#conf t
// Create VLAN - Switch(config)#vlan 10
- Switch(config-vlan)#exit
- Switch(config)#vlan 20
- Switch(config-vlan)#exit
// Assign VLAN - Switch(config)#interface range fastEthernet 0/1-10
- Switch(config-if-range)#switchport mode access
- Switch(config-if-range)#switchport access vlan 10
- Switch(config-if-range)#exit
- Switch(config)#interface range fastEthernet 0/11-20
- Switch(config-if-range)#switchport mode access
- Switch(config-if-range)#switchport access vlan 20
- Switch(config-if-range)#exit
// 0/24 → trunk port - Switch(config)#int fastEthernet 0/24
- Switch(config-if)#switchport mode trunk
ルータ
- Router>enable
- Router#conf t
- Router(config)#interface fastEthernet 0/0.1
- Router(config-subif)#encapsulation dot1Q 10
- Router(config-subif)#ip address 192.168.10.1 255.255.255.0
- Router(config)#interface fastEthernet 0/0.2
- Router(config-subif)#encapsulation dot1Q 20
- Router(config-subif)#ip address 192.168.20.1 255.255.255.0
- Router(config-subif)#exit
- Router(config)#interface fastEthernet 0/0
- Router(config-if)#no shutdown
疎通確認
C:\>ipconfig /all

FastEthernet0 Connection:(default port)

   Connection-specific DNS Suffix..:
   Physical Address................: 00D0.BC33.622B
   Link-local IPv6 Address.........: FE80::2D0:BCFF:FE33:622B
   IP Address......................: 192.168.10.101
   Subnet Mask.....................: 255.255.255.0
   Default Gateway.................: 192.168.10.1
   DNS Servers.....................: 0.0.0.0
   DHCP Servers....................: 0.0.0.0
   DHCPv6 Client DUID..............: 00-01-00-01-ED-E8-A9-A3-00-D0-BC-33-62-2B

Bluetooth Connection:

   Connection-specific DNS Suffix..:
   Physical Address................: 0010.1163.B814
   Link-local IPv6 Address.........: ::
   IP Address......................: 0.0.0.0
   Subnet Mask.....................: 0.0.0.0
   Default Gateway.................: 0.0.0.0
   DNS Servers.....................: 0.0.0.0
   DHCP Servers....................: 0.0.0.0
   DHCPv6 Client DUID..............: 00-01-00-01-ED-E8-A9-A3-00-D0-BC-33-62-2B


C:\>ping 192.168.10.102

Pinging 192.168.10.102 with 32 bytes of data:

Reply from 192.168.10.102: bytes=32 time=1ms TTL=128
Reply from 192.168.10.102: bytes=32 time<1ms TTL=128
Reply from 192.168.10.102: bytes=32 time=11ms TTL=128
Reply from 192.168.10.102: bytes=32 time=3ms TTL=128

Ping statistics for 192.168.10.102:
    Packets: Sent = 4, Received = 4, Lost = 0 (0% loss),
Approximate round trip times in milli-seconds:
    Minimum = 0ms, Maximum = 11ms, Average = 3ms
パターン2
いろいろあってトランクポートを用いない場合()

スイッチ
- enable
- conf t
// Create VLAN - Switch(config)#vlan 10
- Switch(config-vlan)#exit
- Switch(config)#vlan 20
- Switch(config-vlan)#exit
// Assign VLAN - Switch(config)#interface range fastEthernet 0/1-10
- Switch(config-if-range)#switchport mode access
- Switch(config-if-range)#switchport access vlan 10
- Switch(config-if-range)#exit
- Switch(config)#interface range fastEthernet 0/11-20
- Switch(config-if-range)#switchport mode access
- Switch(config-if-range)#switchport access vlan 20
- Switch(config-if-range)#exit
// 0/23, 0/24 → Access port - Switch(config)#interface fastEthernet 0/23
- Switch(config-if)#switchport mode access
- Switch(config-if)#switchport access vlan 10
- Switch(config-if)#exit
- Switch(config)#interface fastEthernet 0/24
- Switch(config-if)#switchport mode access
- Switch(config-if)#switchport access vlan 20
- Switch(config-if)#exit
ルータ
- Router>ena
- Router#conf t
- Router(config)#interface fastEthernet 0/0
- Router(config-if)#ip address 192.168.10.1 255.255.255.0
- Router(config-if)#no shutdown
- Router(config-if)#exit
- Router(config)#interface fastEthernet 0/1
- Router(config-if)#ip address 192.168.20.1 255.255.255.0
- Router(config-if)#no shutdown
- Router(config-if)#exit
おまけ
VLAN単位でポートミラーリングを行いたい場合.
- Switch>ena
- Switch#conf t
- Switch(config)#monitor session 1 destination interface fastEthernet 0/22
所感
今回はルータ側の処理も記述したが, 本来はセキュリティ製品側で設定する.
限られた資源で環境構築するときに:)
Process Hollowing
1. はじめに
Process Injectionの手法の一つにProcess Hollowingがある.
今回はProcess Hollowingについて調べてみた覚書.
2. 手法
2.1. 検証環境
・Windows 7/10
・Dest(Destination) : インジェクションされるプロセス
・Src(Source): インジェクションするPEファイル
以下それぞれのプロセスに対する操作をDest, Srcで示す.
2.2. インジェクションフロー概要
1) Destのプロセスを待機状態(CREATE_SUSPENDED)で作成する(via CreateProcess)
2) DestのPEBを得る(via ntdll!NtQueryInformationProcess)
ここでImageBaseを得る
3) SrcのPEヘッダーをparse
ここでNumberOfSections, Section headerを得る
4) DestをImageBaseを基準としてUnmap(空洞化)する(via ntdll!NtUnmapViewOfSection)
5) DestをImageBaseからOptionalHeader.SizeOfImageだけメモリを確保(via VirtualAllocEx)
6) DestにSrcのヘッダーをOptionalHeader.SizeOfHeadersだけ書き込む(via WriteProcessMemory)
7) DestにSrcのSectionの数(NumberOfSections)だけセクションを書き込む(via WriteProcessMemory)
8) DestとSrcのImageBaseのアドレスが異なる場合, Srcの".reloc"セクションの情報をもとにベースの再配置を行う.
9) (Dest)PEBのImageBaseAddress + SrcのAddressOfEntryPointをEAXに設定->プロセスを再開する(via GetThreadContext -> SetThreadContext -> ResumeThread)
2.3. 補足
2.3.1 PEB(Process Environment Block)について
PEBは以下の構造体で定義される(winternl.h).
typedef struct _PEB {
    BYTE Reserved1[2];
    BYTE BeingDebugged;
    BYTE Reserved2[1];
    PVOID Reserved3[2];
    PPEB_LDR_DATA Ldr;
    PRTL_USER_PROCESS_PARAMETERS ProcessParameters;
    PVOID Reserved4[3];
    PVOID AtlThunkSListPtr;
    PVOID Reserved5;
    ULONG Reserved6;
    PVOID Reserved7;
    ULONG Reserved8;
    ULONG AtlThunkSListPtr32;
    PVOID Reserved9[45];
    BYTE Reserved10[96];
    PPS_POST_PROCESS_INIT_ROUTINE PostProcessInitRoutine;
    BYTE Reserved11[128];
    PVOID Reserved12[1];
    ULONG SessionId;
} PEB, *PPEB;
ここでReserved3[1]はImageBaseAddressに対応する.
2.3.2 ベースの再配置について
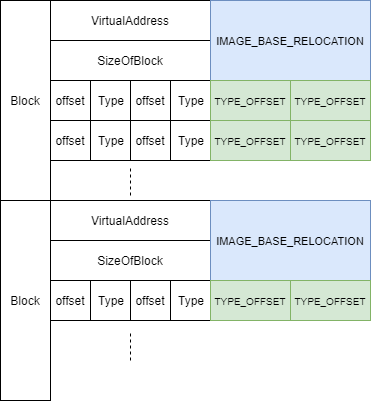
relocation tableには以下の2つの構造体から定義される(winnt.h).
※TYPE_OFFSETは筆者が作成した構造体.
typedef struct _IMAGE_BASE_RELOCATION {
    DWORD   VirtualAddress;
    DWORD   SizeOfBlock;
//  WORD    TypeOffset[1];
} IMAGE_BASE_RELOCATION;
typedef IMAGE_BASE_RELOCATION UNALIGNED * PIMAGE_BASE_RELOCATION;

typedef struct _TYPE_OFFSET {
	WORD offset : 12;
	WORD Type : 4;
}TYPE_OFFSET, *PTYPE_OFFSET;
上記の構造体は以下の図のように配置されている.

TYPE_OFFSETの数は
(IMAGE_BASE_RELOCATION.SizeOfBlock - sizeof(IMAGE_BASE_RELOCATION)) / sizeof(TYPE_OFFSET)
で求められる.
2.4. 実行結果
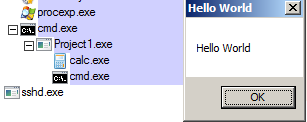
恒例の電卓(calc.exe)に対してProcess Hollowingを用いて, プロセスインジェクションした結果.

3. 所感
Process Hollowing : プロセスの空洞化(そのまま)
4. 参考文献
Windows Serviceのデバッグ
概略
Windows Serviceのデバッグを行いたい場合のためのメモ
自己責任で(VM推奨)
デバッグした後は元の環境に戻す(重要)
環境
手法 その1
サービスの初期状態からデバッグできるようにする
HKEY_LOCAL_MACHINE\SOFTWARE\Microsoft\Windows NT\CurrentVersion\Image File Execution Optionにプログラム名のレジストリキーを作成する.
    HKEY_LOCAL_MACHINE\SOFTWARE\Microsoft\Windows NT\CurrentVersion\Image File Execution
    String Value
    Value name : Debugger
    Value data : <debugger path> -server npipe:pipe=<Session Name>
今回の場合は以下のようにした.
    HKEY_LOCAL_MACHINE\SOFTWARE\Microsoft\Windows NT\CurrentVersion\Image File Execution
    String Value
    Value name : Debugger
    Value data : C:\Debuggers\x86\ntsd.exe -server npipe:pipe=hoge
セッション分離
Windows Vista以降はセッションが分離されているため上記の方法をとる.
それより前のOSだと直接WinDbgを指定してやれば良いらしい(未確認).

Let's Debug!
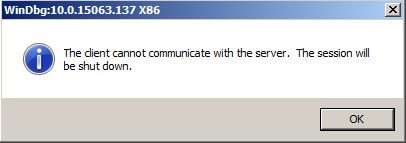
WinDbg → Connect to Remote Session(Ctrl+R)
npipe:server=localhost,pipe=hoge
タイムアウト時間の調整
サービスのタイムアウト時間を伸ばさないとすぐ終了してしまう. デフォルトで30000ミリ秒(30秒).
C:\Windows\System32>sc start MySrv
[SC] StartService FAILED 1053:

The service did not respond to the start or control request in a timely fashion.

HKEY_LOCAL_MACHINE\SYSTEM\CurrentControlSet\Controlでデフォルトのタイムアウト時間を伸ばす. → 再起動
    HKEY_LOCAL_MACHINE\SYSTEM\CurrentControlSet\Control
    DWORD
    Value Name : ServicesPipeTimeout
    Value data : 86400000(Decimal)
※ 86400000(Decimal) = 24hours
※ 全てのサービスに影響するためデバッグ後は修正する
手法 その2(svchostと依存関係がある場合)
svchost.exeと依存関係がある場合, 孤立させる必要がある.
今回はBITS(Background Intelligent Transfer Service)を対象にする.
C:\Windows\System32>sc qc bits
[SC] QueryServiceConfig SUCCESS

SERVICE_NAME: bits
        TYPE               : 20  WIN32_SHARE_PROCESS
        START_TYPE         : 2   AUTO_START  (DELAYED)
        ERROR_CONTROL      : 1   NORMAL
        BINARY_PATH_NAME   : C:\Windows\System32\svchost.exe -k netsvcs
        LOAD_ORDER_GROUP   :
        TAG                : 0
        DISPLAY_NAME       : Background Intelligent Transfer Service
        DEPENDENCIES       : RpcSs
                           : EventSystem
        SERVICE_START_NAME : LocalSystem
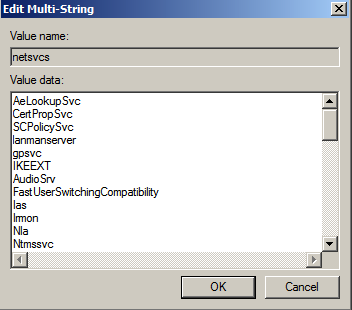
見る箇所はBINARY_PATH_NAMEのグループ名(netsvcs). ちなみにsvchost -k (group).
新しいグループ(TempGrp)を作成する.
    HKEY_LOCAL_MACHINE\SOFTWARE\Microsoft\WindowsNT\CurrentVersion\SvcHost
    REG_MULTI_SZ
    Value Name : TempGrp
    Value data : 孤立させたいサービスのValue data
※ 作成したグループのValue dataにnetsvcsのValue dataを指定する.

元々のグループのsub keyを作成したグループにコピーする.
今回の場合はnetsvcsなのでAuthenticationCapabilities, CoInitializeSecurityParamを新しいグループにコピーすれば良い.

サービスのパスを修正する.
C:\Windows\System32>sc config BITS binPath= "C:\Windows\system32\svchost.exe -k TempGrp"
[SC] ChangeServiceConfig SUCCESS
※ 細かい所だけどbinPathはクオーテーションで囲む, binPath=の後のスペースは必要. ハマりやすい所なので注意.
必要に応じてサービスの再起動を行う. あとは手法 その1と同じ.
手法 その3(非推奨)
MSDNによると非推奨.
svchostを複製する.
%SystemRoot%\System32にsvchost.exeをコピーしてsvchost2.exeを作成する.
C:\Windows\System32>sc config BITS binPath= "C:\Windows\System32\svchost2.exe -k netsvcs"
[SC] ChangeServiceConfig SUCCESS
必要に応じてサービスの再起動を行う. あとは手法 その1と同じ.
所感
個人的には手法1と3(適当)