Pulumiとは
使い慣れたプログラミング言語を使用してインフラストラクチャコードを作成します。
オートコンプリート、型チェック、ドキュメントを備えた IDE を使用して、インフラストラクチャを定義するステートメントを作成します。
はじめに
PulumiのIaCコードは、様々な言語で出力することができます。
本記事では、Pythonで出力してみました。
所感
今のところ、使い勝手はTerraformと変わりはなさそうという感触。
SaaSのPulumi Cloudの利用が必須で、そこでterraformでいうtfstateを管理している。
Pythonなどの言語でIaCコードを書けるので、開発者には向いているかもしれない。
単一のWebサーバを構築するコード
以下のリソースを作成するコードです。
IaC触ったことがある人は、Python知らなくても何となく読める気がします。
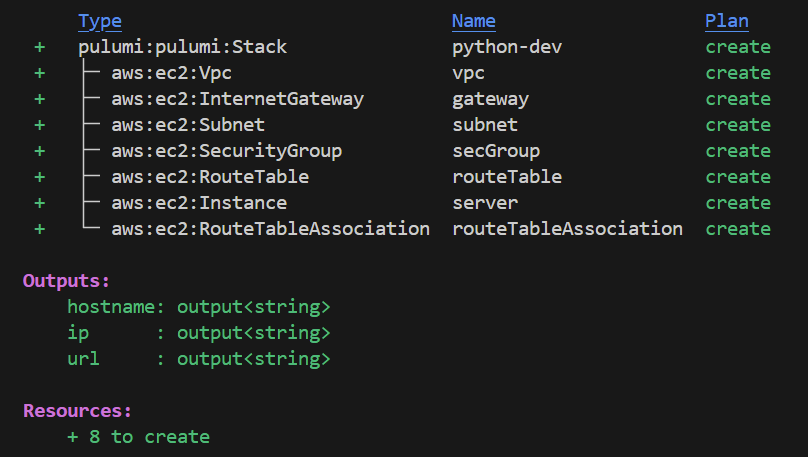
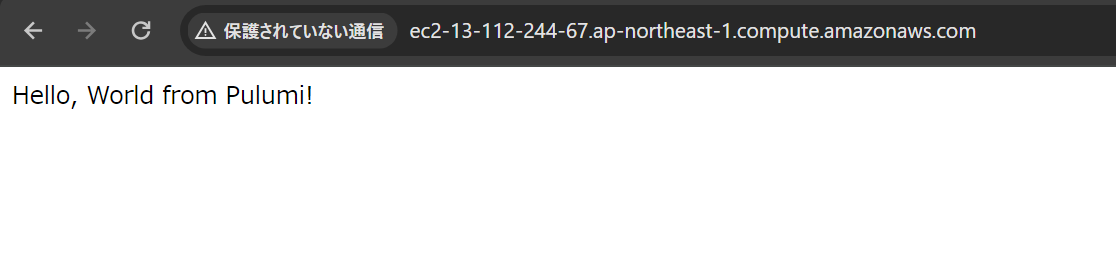
$ cat __main__.py
import pulumi
import pulumi_aws as aws

# Get some configuration values or set default values.
config = pulumi.Config()
instance_type = config.get("instanceType")
if instance_type is None:
    instance_type = "t3.micro"
vpc_network_cidr = config.get("vpcNetworkCidr")
if vpc_network_cidr is None:
    vpc_network_cidr = "10.0.0.0/16"

# Look up the latest Amazon Linux 2 AMI.
ami = aws.ec2.get_ami(filters=[aws.ec2.GetAmiFilterArgs(
        name="name",
        values=["amzn2-ami-hvm-*"],
    )],
    owners=["amazon"],
    most_recent=True).id

# User data to start a HTTP server in the EC2 instance
user_data = """#!/bin/bash
echo "Hello, World from Pulumi!" > index.html
nohup python -m SimpleHTTPServer 80 &
"""

# Create VPC.
vpc = aws.ec2.Vpc("vpc",
    cidr_block=vpc_network_cidr,
    enable_dns_hostnames=True,
    enable_dns_support=True)

# Create an internet gateway.
gateway = aws.ec2.InternetGateway("gateway", vpc_id=vpc.id)

# Create a subnet that automatically assigns new instances a public IP address.
subnet = aws.ec2.Subnet("subnet",
    vpc_id=vpc.id,
    cidr_block="10.0.1.0/24",
    map_public_ip_on_launch=True)

# Create a route table.
route_table = aws.ec2.RouteTable("routeTable",
    vpc_id=vpc.id,
    routes=[aws.ec2.RouteTableRouteArgs(
        cidr_block="0.0.0.0/0",
        gateway_id=gateway.id,
    )])

# Associate the route table with the public subnet.
route_table_association = aws.ec2.RouteTableAssociation("routeTableAssociation",
    subnet_id=subnet.id,
    route_table_id=route_table.id)

# Create a security group allowing inbound access over port 80 and outbound
# access to anywhere.
sec_group = aws.ec2.SecurityGroup("secGroup",
    description="Enable HTTP access",
    vpc_id=vpc.id,
    ingress=[aws.ec2.SecurityGroupIngressArgs(
        from_port=80,
        to_port=80,
        protocol="tcp",
        cidr_blocks=["0.0.0.0/0"],
    )],
    egress=[aws.ec2.SecurityGroupEgressArgs(
        from_port=0,
        to_port=0,
        protocol="-1",
        cidr_blocks=["0.0.0.0/0"],
    )])

# Create and launch an EC2 instance into the public subnet.
server = aws.ec2.Instance("server",
    instance_type=instance_type,
    subnet_id=subnet.id,
    vpc_security_group_ids=[sec_group.id],
    user_data=user_data,
    ami=ami,
    tags={
        "Name": "webserver",
    })

# Export the instance's publicly accessible IP address and hostname.
pulumi.export("ip", server.public_ip)
pulumi.export("hostname", server.public_dns)
pulumi.export("url", server.public_dns.apply(lambda public_dns: f"http://{public_dns}"))
$
環境構築&プロジェクト作成
前回同様、VScodeのDevcontainerでPulumiのコンテナイメージを使用しています。 環境はGitHubに上げています。
まず、適当なディレクトリを作成し、移動します。
次に、pulumi new aws-pythonを実行します。これが便利で、プロジェクトの作成はもちろん、必要なpkgのインストールも実行してくれました。
なお、Purumiコマンドの初回実行時の場合は、アクセストークンの入力が必要です。
$ mkdir get_started/python
$ cd get_started/python/
$
$ pulumi new aws-python
This command will walk you through creating a new Pulumi project.

Enter a value or leave blank to accept the (default), and press <ENTER>.
Press ^C at any time to quit.

project name (python):    // ブランクのままエンターを推すと、(デフォルト値)が入る
project description (A minimal AWS Python Pulumi program):
Created project 'python'

Please enter your desired stack name.
To create a stack in an organization, use the format <org-name>/<stack-name> (e.g. `acmecorp/dev`).
stack name (dev):   // エンター
Created stack 'dev'

aws:region: The AWS region to deploy into (us-east-1): ap-northeast-1    // 東京リージョンを指定
Saved config

Installing dependencies...

Creating virtual environment...
Finished creating virtual environment
Updating pip, setuptools, and wheel in virtual environment...
(略)
Downloading attrs-23.2.0-py3-none-any.whl (60 kB)
   ━━━━━━━━━━━━━━━━━━━━━━━━━━━━━━━━━━━━━━━━ 60.8/60.8 kB 59.0 MB/s eta 0:00:00
Downloading typing_extensions-4.10.0-py3-none-any.whl (33 kB)
Installing collected packages: arpeggio, typing-extensions, six, semver, pyyaml, protobuf, grpcio, dill, attrs, pulumi, parver, pulumi-aws

Successfully installed arpeggio-2.0.2 attrs-23.2.0 dill-0.3.8 grpcio-1.60.1 parver-0.5 protobuf-4.25.3 pulumi-3.111.1 pulumi-aws-6.27.0 pyyaml-6.0.1 semver-2.13.0 six-1.16.0 typing-extensions-4.10.0
Finished installing dependencies
Finished installing dependencies

Your new project is ready to go!

To perform an initial deployment, run `pulumi up`

$
Pythonで出力したIaCコード
作成された各ファイルを確認していきます。
$ ls -la
total 0
drwxr-xr-x 1 vscode vscode 512 Apr 30 12:45 .
drwxr-xr-x 1 vscode vscode 512 Apr 30 12:42 ..
-rw-r--r-- 1 vscode vscode  12 Apr 30 12:45 .gitignore
-rw-r--r-- 1 vscode vscode  37 Apr 30 12:45 Pulumi.dev.yaml
-rw-r--r-- 1 vscode vscode 186 Apr 30 12:45 Pulumi.yaml
-rw-r--r-- 1 vscode vscode 219 Apr 30 12:45 __main__.py
-rw-r--r-- 1 vscode vscode  46 Apr 30 12:45 requirements.txt
drwxr-xr-x 1 vscode vscode 512 Apr 30 12:45 venv
$ ls -l ./venv/
total 0
drwxr-xr-x 1 vscode vscode 512 Apr 30 12:48 bin
drwxr-xr-x 1 vscode vscode 512 Apr 30 12:45 include
drwxr-xr-x 1 vscode vscode 512 Apr 30 12:45 lib
lrwxrwxrwx 1 vscode vscode   3 Apr 30 12:45 lib64 -> lib
-rw-r--r-- 1 vscode vscode  76 Apr 30 12:45 pyvenv.cfg
$
- Pulumi.yaml
$ cat Pulumi.yaml
name: python
runtime:
  name: python
  options:
    virtualenv: venv
description: A minimal AWS Python Pulumi program
config:
  pulumi:tags:
    value:
      pulumi:template: aws-python
$
$ cat Pulumi.dev.yaml
config:
  aws:region: ap-northeast-1
- requirements.txt
$ cat requirements.txt
pulumi>=3.0.0,<4.0.0
pulumi-aws>=6.0.2,<7.0.0
$ cat __main__.py
"""An AWS Python Pulumi program"""

import pulumi
from pulumi_aws import s3

# Create an AWS resource (S3 Bucket)
bucket = s3.Bucket('my-bucket')

# Export the name of the bucket
pulumi.export('bucket_name', bucket.id)
Pulumi CloudでプロジェクトをYaml出力と比較したところ、言語の違いだけでこれといった差異はありませんでした。
スタックのデプロイ
pulumiコマンドで、リソースを作成します。
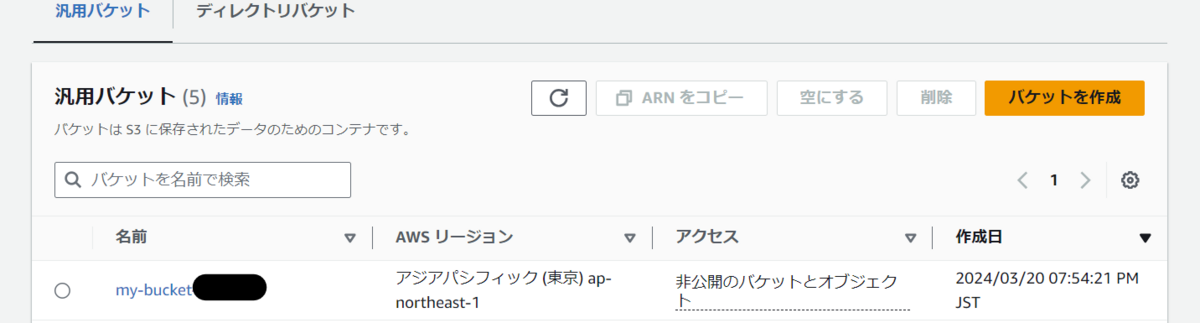
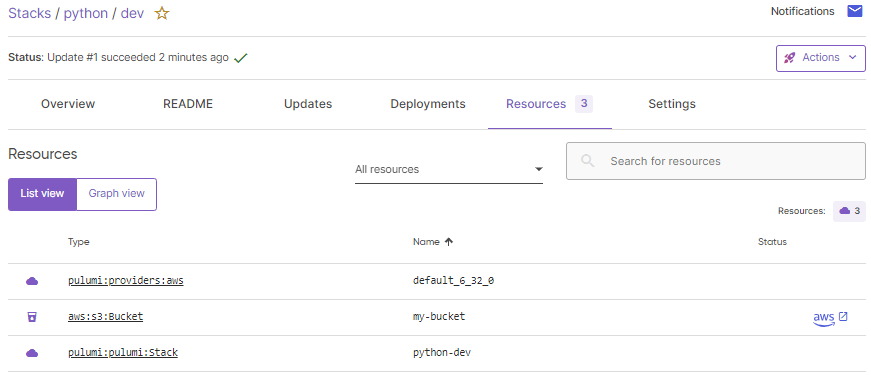
$ pulumi up
Previewing update (dev)

View in Browser (Ctrl+O): https://app.pulumi.com/mito-201/python/dev/previews/***

     Type                 Name        Plan
 +   pulumi:pulumi:Stack  python-dev  create
 +   └─ aws:s3:Bucket     my-bucket   create

Outputs:
    bucket_name: output<string>

Resources:
    + 2 to create

Do you want to perform this update? yes
Updating (dev)

View in Browser (Ctrl+O): https://app.pulumi.com/mito-201/python/dev/updates/1

     Type                 Name        Status
 +   pulumi:pulumi:Stack  python-dev  created (5s)
 +   └─ aws:s3:Bucket     my-bucket   created (2s)

Outputs:
    bucket_name: "my-bucket-e5e00c1"

Resources:
    + 2 created

Duration: 9s

$
スタックのデストロイ
pulumiコマンドで、作成したリソースを削除します。
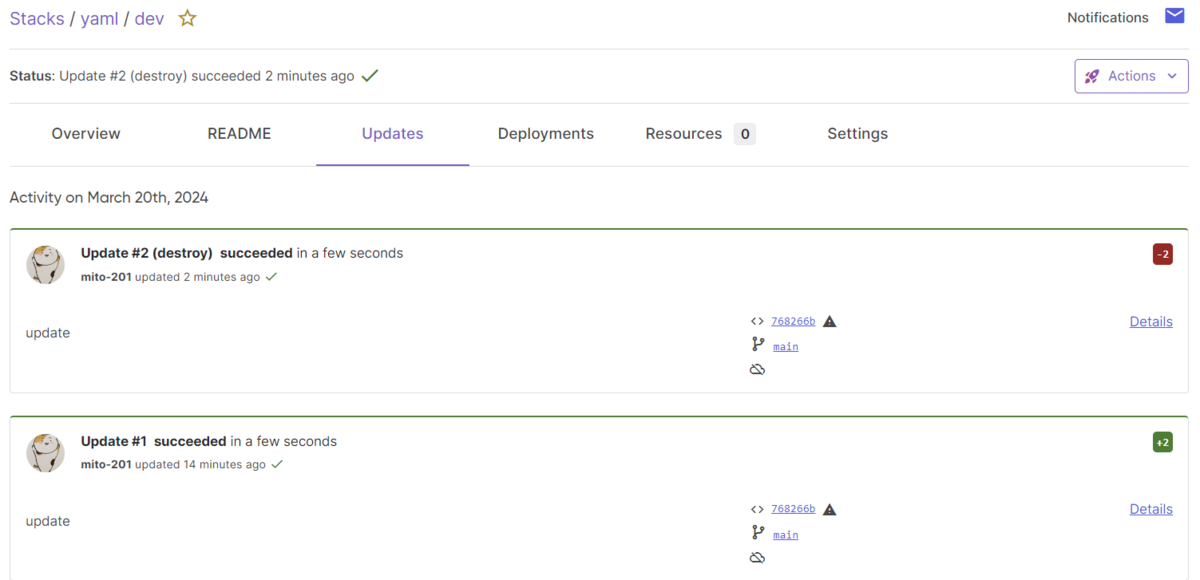
$ pulumi destroy
Previewing destroy (dev)

View in Browser (Ctrl+O): https://app.pulumi.com/mito-201/python/dev/previews/e75bfeab-cb2b-4086-b33b-22a0d77bad9e

     Type                 Name        Plan
 -   pulumi:pulumi:Stack  python-dev  delete
 -   └─ aws:s3:Bucket     my-bucket   delete

Outputs:
  - bucket_name: "my-bucket-e5e00c1"

Resources:
    - 2 to delete

Do you want to perform this destroy? yes
Destroying (dev)

View in Browser (Ctrl+O): https://app.pulumi.com/mito-201/python/dev/updates/2

     Type                 Name        Status
 -   pulumi:pulumi:Stack  python-dev  deleted (0.49s)
 -   └─ aws:s3:Bucket     my-bucket   deleted (0.81s)

Outputs:
  - bucket_name: "my-bucket-e5e00c1"

Resources:
    - 2 deleted

Duration: 4s

The resources in the stack have been deleted, but the history and configuration associated with the stack are still maintained.
If you want to remove the stack completely, run `pulumi stack rm dev`.
$
Pulimi Cloudのスタックの削除
Pulimi Cloudにはスタックが残っているので、pulumi stack rm devで完全に削除します。
なお、IaCコードファイルは残ります。
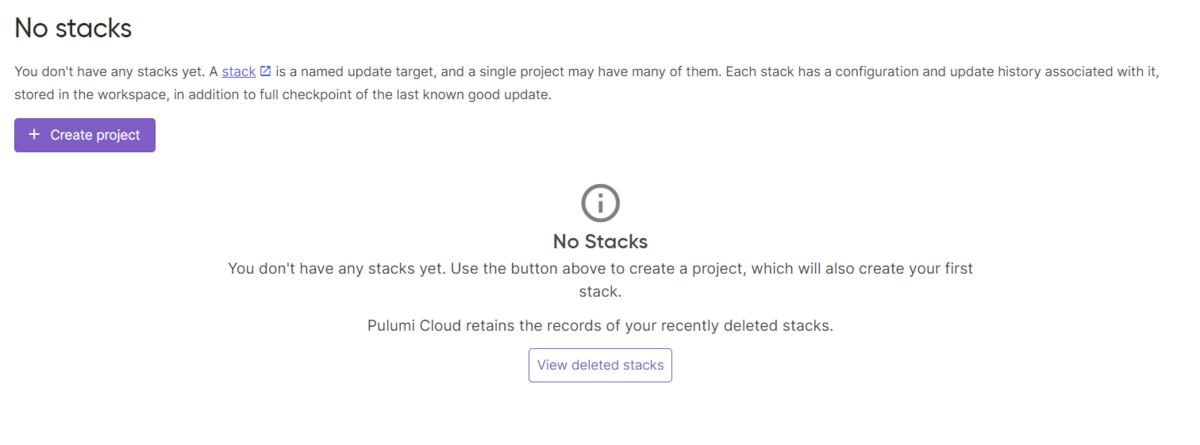
$ pulumi stack rm dev
This will permanently remove the 'dev' stack!
Please confirm that this is what you'd like to do by typing `dev`: dev
Stack 'dev' has been removed!
$
$ ls
Pulumi.yaml  __main__.py  __pycache__  requirements.txt  venv
$
その他
AWSクレデンシャルを登録しなかった場合のエラー
この程度のエラーであれば分かりやすいです。対応方法も提示されています。
error: pulumi:providers:aws resource 'default_6_32_0' has a problem: No valid credential sources found.
$ pulumi up
Previewing update (dev)

View in Browser (Ctrl+O): https://app.pulumi.com/mito-201/python/dev/previews/b74b3442-46fc-4bf7-955f-5aed8248d705

Downloading plugin: 229.75 MiB / 229.75 MiB [======================] 100.00% 23s

[resource plugin aws-6.32.0] installing
     Type                     Name            Plan       Info
 +   pulumi:pulumi:Stack      python-dev      create
     └─ pulumi:providers:aws  default_6_32_0             1 error

Diagnostics:
  pulumi:providers:aws (default_6_32_0):
    error: pulumi:providers:aws resource 'default_6_32_0' has a problem: No valid credential sources found.
    Please see https://www.pulumi.com/registry/packages/aws/installation-configuration/ for more information about providing credentials.
    NEW: You can use Pulumi ESC to set up dynamic credentials with AWS OIDC to ensure the correct and valid credentials are used.
    Learn more: https://www.pulumi.com/registry/packages/aws/installation-configuration/#dynamically-generate-credentials