Java SEアプリケーションにHTTP Server機能を組み込みたい(Grizzly編)
受託の開発をやっていると既存のJava SEアプリケーションにHTTP Serverとしての機能を組み込みたい、といった要件を提示されることも多々あります。
GrizzlyはJava EEアプリサーバのGlassFishで採用されているHTTPサーバの実装ライブラリで、Java SEアプリケーションに単体で組み込むこともできます。
公式サイト
https://javaee.github.io/grizzly/
公式のサンプルほぼそのままですが、Mavenプロジェクトでの実装例を記載します。
まずは、pom.xmlに以下の通り追記して保存します。
<dependencies>
	<dependency>
		<groupId>org.glassfish.grizzly</groupId>
		<artifactId>grizzly-http-server</artifactId>
		<version>2.4.4</version>
	</dependency>
</dependencies>
Grizzlyを使用するために必要なライブラリが自動的ダウンロードされプロジェクトに取り込まれます。
うまくいかない場合は、おおよそWebプロキシが原因なのでsettings.xmlに然るべき設定をしてリトライしましょう。
次に新規クラスを作成してmainメソッドを以下の通り記載します。
package net.xamarinian.examples;

import java.nio.charset.StandardCharsets;

import org.glassfish.grizzly.http.server.HttpHandler;
import org.glassfish.grizzly.http.server.HttpServer;
import org.glassfish.grizzly.http.server.Request;
import org.glassfish.grizzly.http.server.Response;
import org.glassfish.grizzly.http.util.ContentType;

public class GrizzlyMain {

	/**
	 * Java SEアプリケーションにHTTP Serverを組み込むサンプル(Grizzly版)
	 * @param args
	 */
	public static void main(String[] args) {
		// リッスンポート8080でサーバインスタンスを生成
		final HttpServer server = HttpServer.createSimpleServer();
		// サーバにハンドラを登録
		server.getServerConfiguration().addHttpHandler(
				new HttpHandler() {
					@Override
					public void service(Request request, Response response) throws Exception {
						String data = "Hello Grizzly!!";
						response.setContentType(ContentType.newContentType("text/plain", "UTF-8"));
						response.setContentLength(data.getBytes(StandardCharsets.UTF_8).length);
						response.getWriter().write(data);
					}
				}, "/grizzly");

		try {
			// HTTP Server開始
			server.start();
			System.out.println("Press any key to stop the server...");
			System.in.read();

		} catch (Exception e) {
			e.printStackTrace();

		} finally {
			server.shutdownNow();
		}
	}
}
mainメソッドの実装が終わったらさっそくアプリケーションを実行してみます。
サンプルのHttpServerへはhttp://localhost:8080/grizzlyからアクセスすることが可能です。
Webブラウザからも当然アクセス可能ですが、PowerShellのInvoke-WebRequestコマンドレット(curl)を使うとヘッダ情報まで確認できて便利です。
PS C:\Windows\system32> curl http://localhost:8080/grizzly


StatusCode        : 200
StatusDescription : OK
Content           : Hello Grizzly!!
RawContent        : HTTP/1.1 200 OK
                    Content-Length: 15
                    Content-Type: text/plain;charset=UTF-8

                    Hello Grizzly!!
Forms             : {}
Headers           : {[Content-Length, 15], [Content-Type, text/plain;charset=UTF-8]}
Images            : {}
InputFields       : {}
Links             : {}
ParsedHtml        : mshtml.HTMLDocumentClass
RawContentLength  : 15
UIntegerに0x80000000を代入したい
VB.NETのUIngeterに16進数の0x80000000を代入しようとしてエラーに遭遇しました。
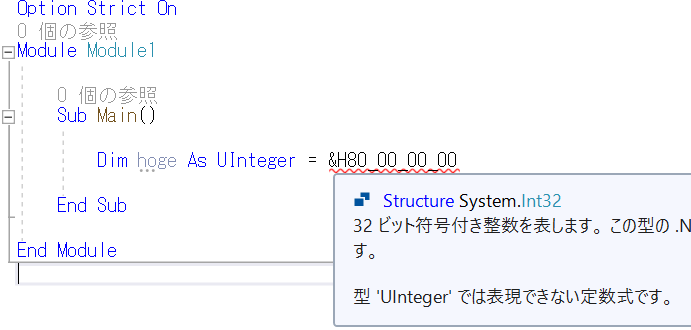
小一時間調べたところ、VB.NETで&H80000000はIntegerのリテラルとして認識されるため、10進数でいうところの-2147483648として評価されているようです。
&H80000000を明示的に、UIntegerのリテラルだと認識させるには末尾にUIを付けます。
Option Strict On
Module Module1

    Sub Main()

        Dim hoge As UInteger = &H80_00_00_00UI

    End Sub

End Module
ちなみに、C#では特に問題ないようです。
TableViewの下のViewの高さが確保できない場合の対処
iOSでTableViewとかListViewの様なスクロールできるViewの下にContentViewを設置するとHeigthRequestで指定した高さを確保できない場合があります。
続きを読む共有プロジェクトにXamlを追加できない不具合
こんにちは、world_wide_anitoです。
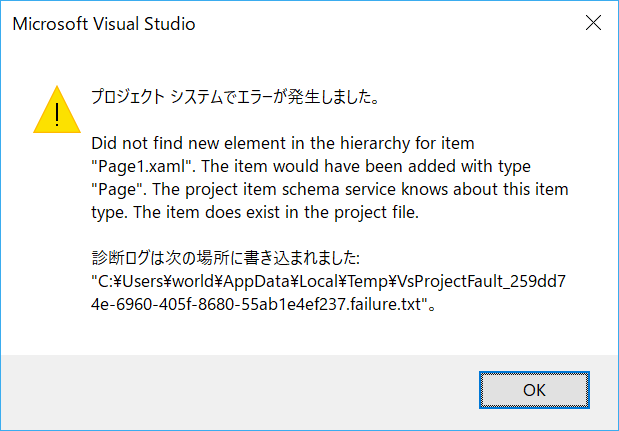
PCを新調してからというもの、Xamarin.Formsの共有プロジェクトでXamlコンテンツを追加すると、以下のようなダイアログが表示されて、コードビハインドのみがプロジェクトに追加されるという現象が発生していました。
TextCellをカスタマイズしたい。
こんにちは、world_wide_anitoです。
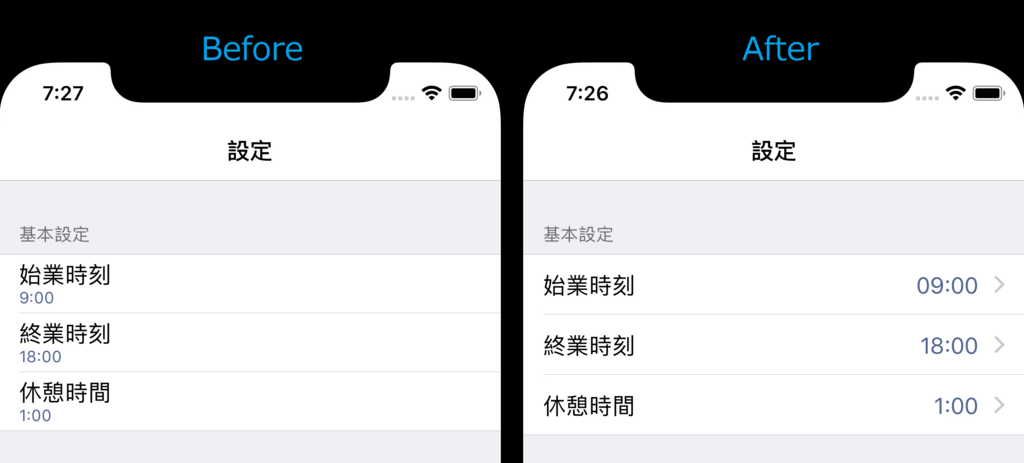
TableViewなどで使用するTextCellをiPhoneの設定アプリっぽくカスタマイズしました。
当初、Cellに「>」をつけるのにも画像とか用意しないといけないのかなーとか思ってましたがそんなことはありませんでした。なお、本記事の内容はiOS向けの内容となっています。
TextCellのサブクラスを作成
TextCellを直接カスタマイズすることも可能ですが、組み込みのクラスを直接いじるのは気が引けるので今回はカスタマイズ用のサブクラスを作成することにします。といっても、TextCellを継承するだけで特に何を設定する必要もありません。
using Xamarin.Forms;

namespace TableViewSample
{
    public class MyTextCell: TextCell
    {
    }
}
カスタムレンダラーの作成
次にMyTextCellのカスタムレンダラーをiOSプロジェクトの中に作成します。TextCellのカスタムに使用するカスタムレンダラーは、TextCellRendererとなっています。
レンダラーの基本クラスおよびネイティブ コントロール - Xamarin | Microsoft Docs
using TableViewSample;
using TableViewSample.iOS;
using UIKit;
using Xamarin.Forms;
using Xamarin.Forms.Platform.iOS;

[assembly: ExportRenderer(typeof(MyTextCell), typeof(MyTextCellRenderer))]
namespace TableViewSample.iOS
{
    class MyTextCellRenderer : TextCellRenderer
    {
        public override UITableViewCell GetCell(Cell item, UITableViewCell reusableCell, UITableView tv)
        {
            return base.GetCell(item, reusableCell, tv);
        }
    }
}
ここまでは、Visual Studioのクイックアクションでほぼ全自動で作成することができます。
TextとDetailを横並びにする
TextとDetailを横並びのレイアウトにカスタマイズするには、カスタムレンダラーのGetCellメソッドに以下の様に書き換えます。
public override UITableViewCell GetCell(Cell item, UITableViewCell reusableCell, UITableView tv)
{
    var tvc = reusableCell as CellTableViewCell;
    if(tvc == null)
    {
        tvc = new CellTableViewCell(UITableViewCellStyle.Value1, item.GetType().FullName);
        tvc.Cell = item;
    }
    return base.GetCell(item, tvc, tv);
}
ここで一番重要なのは、UITableViewCellStyle.Value1の部分、ここがTextとDetailを横並びにするという指定になっています。なお、TextCellの既定値はUITableViewCellStyle.Subtitleです。UITableViewCellStyleの詳細については、以下の記事が大変参考になりました。
mikamiz|UITableViewとUITableViewCellのスタイル
アクセサリーをつける
次にTextCellの右側の「>」マークを付けます。DisclosureIndicatorと言うらしいです。
public override UITableViewCell GetCell(Cell item, UITableViewCell reusableCell, UITableView tv)
{
    var nativeCell =  base.GetCell(item, reusableCell, tv);
    nativeCell.Accessory = UITableViewCellAccessory.DisclosureIndicator;
    return nativeCell;
}
アクセサリーには、ほかにもチェックマークとかも設定できます。
設置する
TableViewのIntentプロパティにSettingsを設定すると、よりiPhoneの設定アプリっぽくなります。
<?xml version="1.0" encoding="utf-8" ?>
<ContentPage xmlns="http://xamarin.com/schemas/2014/forms"
             xmlns:x="http://schemas.microsoft.com/winfx/2009/xaml"
             xmlns:local="clr-namespace:TableViewSample"
             x:Class="TableViewSample.MainPage"
             Title="設定">

    <TableView Intent="Settings">
        <TableSection Title="基本設定">
            <local:MyTextCell Text="始業時刻" Detail="9:00" />
            <local:MyTextCell Text="終業時刻" Detail="18:00" />
            <local:MyTextCell Text="休憩時間" Detail="1:00" />
        </TableSection>
    </TableView>

</ContentPage>
共有プロジェクトの名前はハイフンを含んではいけない。
こんにちは、world_wide_anitoです。
ある日、Xamarin.Forms(共有プロジェクト)でプロジェクトを作成したところ、
何やらいつもと違う違和感を感じます。

プラットフォーム毎のプロジェクトが作成されてないではありませんか!?
そもそも共有プロジェクト自体、ツリーが開かないし変な感じです。
フォルダー ビューで確認してみると、プロジェクト自体は作成されている様子。
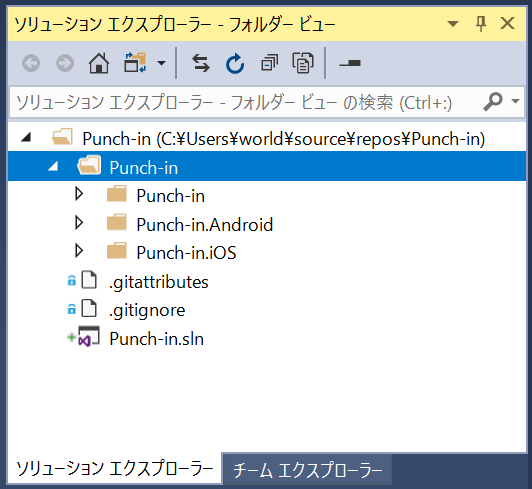
ならば、改めてプロジェクトを追加しようとするとこんなエラーがでるのです。
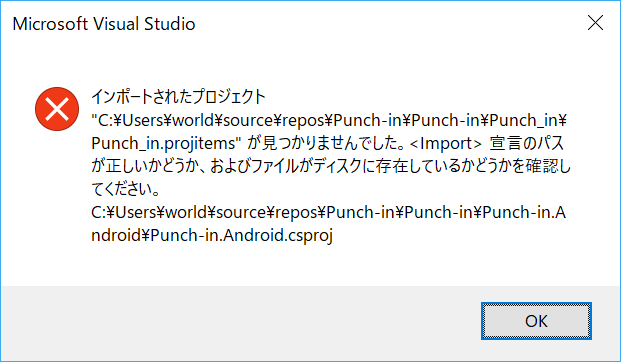
この現象、共有プロジェクトでプロジェクト名にハイフンを含む場合に発生するようです。
本来プロジェクト名にハイフンを含む場合、名前空間や一部の設定ファイルの類では、
アンダーバーに変換されるのですが、そのあたりの連携が上手く行っていないように見えます。
今回の例では、Punch_in.projitemsが見つからない旨のエラーが出力されていますが、
実際に作成されていたファイルは、Punch-in.projitemsだったのでそのあたりが、原因なのだろうと思います。
今までずっと、共有プロジェクトだけを使ってきた自分としては複雑な気持ちではありますが、
プロジェクト名にハイフンを使わなければ良いだけの話なので、回避は簡単そうです。
開発環境
- Visual Studio 2017 v15.7.1
- Xamarin.Forms v3.0.0.446417
UrhoSharp.FormsでHelloWorld
こんにちは、world_wide_anitoです。
今回は、Xamarin.Forms上でUrhoSharpアプリケーションを動かすまでのサンプルプログラムを作ってみました。
github.com
なお、このサンプルプログラムは以下のブログを参考に作成しております。
Introduction to UrhoSharp in Xamarin Forms - Xamarin Helpxamarinhelp.com
開発環境
- Visual Studio 2017 v15.7.1
- Xamarin.Forms v3.0.0.446417
- UrhoSharp.Forms v1.8.93
プロジェクトの作成
まずは、Xamarin.Formsのプロジェクトを作成して、NuGetからUrhoSharp.Formsをインストールします。
Xamlの編集
MainPage.xamlを以下の通り編集します。
PreserveViewは、Xamarin.Formsと共存を確認するための領域で灰色に表示されるだけで特に使用しません。
<?xml version="1.0" encoding="utf-8" ?>
<ContentPage xmlns="http://xamarin.com/schemas/2014/forms"
             xmlns:x="http://schemas.microsoft.com/winfx/2009/xaml"
             xmlns:local="clr-namespace:HelloUrho"
             x:Class="HelloUrho.MainPage">

    <StackLayout Spacing="0">
        <ContentView x:Name="UrhoView" VerticalOptions="FillAndExpand" BackgroundColor="Aqua"/>
        <ContentView x:Name="PreserveView" HeightRequest="50" BackgroundColor="Gray"/>
    </StackLayout>

</ContentPage>
UrhoSurfaceの設定
UrhoSurfaceクラスのインスタンスを生成して、Xamlで定義したUrhoViewの子要素として追加します。
    public partial class MainPage : ContentPage
    {
        private UrhoSurface urhoSurface;

        public MainPage()
        {
            InitializeComponent();

            urhoSurface = new UrhoSurface();

            // UrhoViewはMainPage.xamlで定義済
            this.FindByName<ContentView>("UrhoView").Content = urhoSurface;
        }
    }
UrhoSharpアプリケーションの作成
Urho.Applicationを継承するクラスを定義します。Xamarin.Forms.Applicationと混同しないように、名前空間は省略せずに記載しましょう。
テキストを表示するには、Textクラスを使用します。Textクラスでは、フォントを指定が必須なので忘れず設定しましょう。
CoreAssets.Fonts.AnonymousProというのは、コンポーネントに組み込まれているフォントで、"Fonts/Anonymous Pro.ttf"と指定することもできます。
    class HelloUrhoApp : Urho.Application
    {
        public HelloUrhoApp(ApplicationOptions options) : base(options)
        {
        }

        protected override void Start()
        {
            base.Start(); // 必須

            var helloText = new Text()
            {
                Value = "Hello Urho",
                HorizontalAlignment = HorizontalAlignment.Center,
                VerticalAlignment = VerticalAlignment.Center,
            };

            // フォントの指定は必須
            helloText.SetFont(CoreAssets.Fonts.AnonymousPro, 80f);

            this.UI.Root.AddChild(helloText);
        }
    }
UrhoSharpアプリケーションの起動
MainPageにOnAppearingメソッドを追加して、起動するアプリケーションクラスを指定します。
    public partial class MainPage : ContentPage
    {
        private UrhoSurface urhoSurface;

        protected override async void OnAppearing()
        {
            base.OnAppearing();
            await urhoSurface.Show<HelloUrhoApp>(new ApplicationOptions(assetsFolder: null));
        }
    }
実行結果
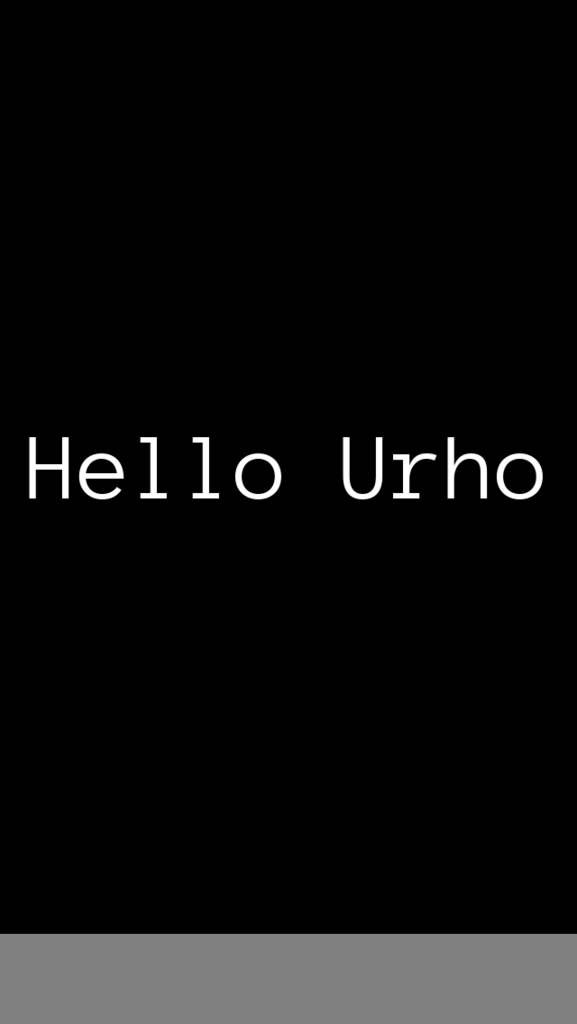
画面いっぱいにでかでかと、Hello Urhoと表示されました。

